Looking for a creative way to remember the big day without using the standard guest book? I recently shared a couple of fun ideas with writer Anna Sachse that were published around the web…
4 Unique Guest Book Ideas … No Book Required
July 14, 2011 1:59 pm by Anna Sachse

Friend & Family Recipe Book
For a sweet (or savory) reminder of loved ones, Rachel Bowes, owner of Seattle-based Finch & Thistle Events, suggests including a blank recipe card with your invitation, as well as a note requesting that guests scribble down a favorite recipe (and why it’s meaningful) and bring the card to the wedding. At the reception, set up a table where guests can then affix their card to a classy notebook, and find blank cards if needed.
Guest Book Box
Mette Morgan, co-founder and editor of DIYWedding.org, suggests decorating a heart-shaped box (with a lid!) and either cutting out or buying a stack of heart-shaped pieces of thin cardboard – at least one per guest. You can then either set up a table or hand out the hearts during dinner. After all the guests write their messages, the hearts are placed in the box, which is then sealed and not to be reopened until your first anniversary.
To see the rest of the ideas, you can check out Anna’s article here.
I have been meaning to attend a 2nd Saturdayz for some time and now that wedding season is winding down, I finally got to check it out. A must for vintage loving brides and designers, 2nd Saturdayz is held every month on, you guessed it, the second Saturday over at Magnusen Park in Sandpoint.

Perhaps the poster gives it away, but this is no ordinary flea market. This is a market where every booth is styled and decorated to be worthy of a magazine shoot. The ladies who run the show, known as The Junk Tribe, are passionate about vintage shabby chic and picky about which vendors they let in the door. I scored some fabulous new props for next summer’s weddings (library card catalog as seating chart -anyone?), a $20 vintage Christmas tree and some gorgeous holiday trees made from recycled wool sweaters. 
 |
 |
There was plenty of inspiration for holiday decorating and winter weddings too.


 |
 |

 |
 |
The next one will be held on December 11. See you there!
- Tagged: DIY ideas, event design, vintage, wedding
- |
- Comments Off on 2nd Saturdayz
As a Brit who didn’t grow up celebrating Halloween, I have to admit that sometimes I find it hard to get into the ghostly spirit beloved of my friends and neighbors. After an unfortunate incident in college involving a large pumpkin and a broken car windshield, I had sworn off that particular squash for life…that is, until I saw these gorgeous pumpkins from Kathleen at Twig and Thistle. I think these would work equally well for Thanksgiving dinner or a holiday party. Click here to see more of Kathleen’s fun ideas.
DIY Pumpkin Candle Holders for BHG
October 22nd, 2010 


I shared my third project for the Better Homes & Gardens contest yesterday and today I have all the materials and instructions you’ll need to make your own. With just a few simple steps, you can make any foam gourd into a pretty and natural looking fall accessory. Have fun!
Supplies
Styrofoam Pumpkin
Candle
Drill
Hole Saw Attachment for drill (found at hardware stores)
Craft Glue
Glitter
Instructions
Determine the width of the candle and make sure the hole saw is just slightly larger. Remove the stem and locate the center on top of the pumpkin. With the pumpkin firmly secure, center the hole cutting attachment above the pumpkin and slowly drill out the center. It may help to have someone hold the pumpkin steady while you drill. Once center is cut, you’ll need to carve out the foam with a knife. Continue the process until you have desired depth.
Once the hole is cut, coat entire pumpkin in craft glue. Generously cover with colored glitter and let dry. Once glitter is dry and to prevent glitter from flaking off, spray with a bit of hairspray to set.
Use non-drip candles (typically the wide candles don’t) or if you’re using tea-lights, opt for ones that have a plastic or metal cup so that wax doesn’t get into pumpkin. Place candle inside and light!
*As with all flammables, be mindful and keep a watchful eye.
- Comments Off on DIY Pumpkins from Twig & Thistle
Vintage, garden chic is a popular look for weddings this year and is featured almost exclusively on blogs like Style Me Pretty and Once Wed. Vintage fabrics, cake plates and mason jars can be sourced at a premium on Ebay and Craigslist but somehow paying a fortune for something meant to give off a casual DIY feeling just doesn’t feel right. Here’s a fun idea that one of my brides and I came up with to create a vintage dessert display for her upcoming wedding.
What you’ll need:
Glass serving platters of varying sizes
Glass goblets, old fashioned ice cream glasses, ashtrays, or candle holders
Jam jars
Glass appropriate super glue
We found all our glass platters, goblets and Mason jars at the Seattle Goodwill but local flea markets, garage sales and estate sales are also a good place to look. Varying sizes and heights make for a more interesting display and we used different shades of blue glass for a fun twist.
This is such an easy project! First wash and dry all the glassware. Assemble everything on a table and play around with the different pieces. Try and put together a mix of high and low platters and experiment with turning the sundae glasses and goblets upside down to see which look you like best. When you’re pleased with how everything looks simply glue together the matching pieces with a thin line of super glue around the edge of the base piece. Be sure to center the base or your platters will topple when you put food on them!
Arrange a few blossoms in jam jars, add a couple of candles and voila! A vintage dessert display for less than $75!


I recently started posting some of my events on a Shutterfly page (http://finchandthistle.shutterfly.com/) and I wanted to share how fun and easy it is to make a professional looking (and free) website with their new member pages. You will have to sign up with Shutterfly (also free) to make a site, but once you are a member they have numerous layouts and doo-dads (is that a technical term?) that you can add on. Very cool. The best part is that anyone you direct to the site can download your pictures to print or post on the internet. What a great way to share family photos! And don’t even get me started on the photo books…I am in the process of putting together some formal portfolio books right now and couldn’t be more excited about having a professionally printed, bound book to show future clients.

- Comments Off on Why I love Shutterfly…
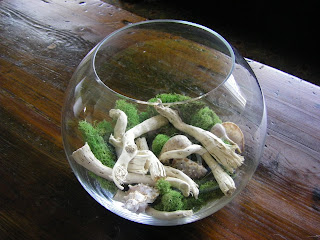
Green and eco-friendly weddings are no longer a trend; they are an increasingly popular way to showcase a couple’s creativity in a recession. Brides everywhere are looking to spend their budgets wisely and an everlasting centerpiece is a frugal and easy way to go.


- Comments Off on Found Objects